Monday, October 31, 2011

Product Review: Dior Addict High Shine Lipstick

Kate Moss for Dior Addict lipstick
www.talentmanagement.com
This is a product review of Dior Addict's Lipstick. The shade I tried out personally is called Orange Ovation Spotlight Coral (number 530.)

Let's talk packaging. This is one adorable tube of lipstick! a sleek silver lipstick tube encased within a rainbow-esque translucent top that gives the product a futuristic yet retro appearance. This isn't the kind of lipstick you'll want to apply in the bathroom as this one deserves way too much attention!

Dior Addict Lipstick
http://www.sephora.com/

Now for product. The lipstick itself has a really creamy formula. This translates into a really hydrating and moisturizing effect. The creaminess also contributes to a very fresh and dewy appearance, tres sexy! As for wear, I wasn't a big fan, as with all creamy lipsticks, there's never much of a long lasting effect.

Then there's the price. In the states, sephora sells Dior Addict Lipstick for 28$. In Lebanon, however, it sells for around 55,000LL to 70,000LL depending on where you purchase it. Not too much of a bargain, and there certainly are more affordable alternatives which probably have the same effect. However, if you're in the market for designer cosmetics, it really is a nice buy.

Thursday, October 27, 2011

Product Review: Alternate Uses for NIVEA Visage Anti-Wrinkle Q10 Plus Eye Cream


NIVEA Visage Anti-Wrinkle Q10 Plus Eye Cream
http://www.cosmetics-thai.com/
Ok, I really wouldn't know about it's anti-wrinkle qualities (I'm 21 years old) but I've found it very useful for conditioning, protecting, and improving the skin on my eye area.

The skin around your eye area is considerably thinner than on the rest of your face, for most people this means constantly dealing wth dry skin.

The great thing about NIVEA Visage Anti-Wrinkle Q10 Plus Eye Cream is that helps smooth and condition the area without being too heavy, greasy, or irritating. I like to use it at night after removing my makeup, and sometimes before applying my makeup in the morning depending on how dry my lids are.

Here's what I loved most about it: about 2 minutes after applying a thin layer to my lids, eyeshadow application was so much more successful, it was about as successful as any eyeshadow primer on the market today. (Though I can't say the same for how well it prevented creasing.) The eyeshadow colors showed up bolder and went on the lid with ease.

Bottom line: eyshadow and dry eyelids are mortal enemies, the more moisturized your lids, the more you'll have an easy and gorgeous shadow application. Try it out!

Tuesday, October 25, 2011

Product Review: Maybelline Cat Eyes Mascara

<> <> <> <> <> <>
Maybelline Cat Eyes Mascara
photo credit: blogspot.com
Honesty is the best policy, and I honestly have a love/hate relationship with Maybelline's Cat Eyes Mascara. I'll start with what I liked about it. First of all, the packaging is to die for (I love the adorable cheetah detail on the top!) Secondly, it had a nice effect in terms of length. I felt like my lashes looked considerably longer while wearing this mascara (and even somewhat longer after I had removed the mascara!)


Now for the negative: I really hated the mascara wand. Its so thin!!! much thinner than it appears to be in the image above. I guess I'm just a fan of those huge, chunky, and full mascara wands (let's face it, that's the only way you're going to acheive volume.) On the other hand, Maybelline didn't promise volume, they promised longer lashes (with an emphasis on the outer lashes for that classic "cat" look.) 


Additionally, the formula was ANNOYING to say the least. Unlike the more classic toothpaste-like consistency of most mascara formulas, Maybelline's Cat Eyes Mascara had a formula more like water! I don't need to tell you how devastating it is to finish off your eye makeup after applying eyeshadow only to see black gunk splattered all over your lids, and yes, there was considerable "backsplash" after the application.


Last but not least was the clumping issue. I was so surprised that this mascara gave me a problem with clumping! (Given the skinny wand, and the water-like consistency of the formula.) After a single coat, it barely had any effect, especially on those infamous outer lashes. However, after applying additional coats it just started creating clumps out of nowhere! Total catch 22.


Overall, if you can get past the cleanup you'll need to do on your lids, the effect is alright. Definately not the best mascara I've ever tried. (Still looking!)


Personal tip* try getting a different wand from another mascara you enjoyed and use it with the cat eyes formula. I had a nicer result when I tried this!

Saturday, October 22, 2011

60's inspired liner look

step 1:
prepare the upper lid with a very light layer of medium shine eyeshadow base so that your liner colors show up bold. a great eyeshadow base for this look is MAC's rubenesque paint pot
<><> <><> <><>
MAC Paint Pot in Rubenesque
photo credit:
namalabeauty.files.wordpress.com
step 2:
it's time for the the pink liner application. This line will begin in the inner corner socket of the eyelid and follow the natural line of your eye crease until halfway. At this point you'll pull the line "up" parallel to the angle your eyelashes point up. Extend this line almost as far as the end of the brows.

There are a wide variety of colored gel liners you could use for this step (using a thin angled brush.) for this photo I used Makeup Forever's Aqua Cream.
<><> <><> <><>
Makeup Forever's Aqua Cream in Fresh Pink
photocredit: static.zoovy.com
step 3:
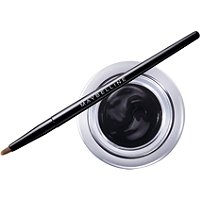
the next step is to add the black liner. For this look I used a black gel liner and the same small angle brush mentioned in the previous step. Begin with a thin line along the inner lashes, gradually creating a thicker line as you go along. When you reach the end of your eye, pull the liner up into the iconic 60's wing shape. A good choice for black gel liner is Maybelline's Eye Studio Gel Liner.


<><> <><> <><>
Maybelline's Eye Studio Gel Liner in Blackest Black
photo credit: ulta.com

I hope you enjoy the look! try it out!